Tech

Friday 6 May 2011

Free Signer Application For Nokia 5800, N97, Nokia 5530


You can install a signer application straight onto your 5800, and sign it on your phone. To do this, we’re going to use an application called FreeSigner, which you can download from below
Using FreeSigner is really simple;
Pre-requisites:
* FreeSigner (download link below).
* your developer certificate (you can request for your certificate and key file from us)
COMPLETE STEP BY STEP FOR SIGNING PROCESS:
* Copy your developer certificate and key file into a directory on my memory card, in the “Certs” sub-folder under the “Documents” folder, so it’s located in “E:\Documents\Certs”,
Place it anywhere you can find it easily later.
Having installed FreeSigner on your phone, launch it from the “Applications” menu. You need to configure some settings first. Tapping “Options” – “Settings” will bring up the following screen:
1
# Ignore the items which say “Self sign” in front of them. Self signing may wont work for a lot of applications, so it is importnat that you have your own certificate and key file for signing all application / games / themes. and for which you can place your request here by posting your IMEI umber.
# Now, tap on “Sign Cert”. FreeSigner will now prompt you to select your certificate file, usually a file whose extension is “cer”. Select this file, and its name will appear like in the screen above.
# Next, tap on “Sign Key”. FreeSigner will now prompt you to select your certificate file, usually a file whose extension is “key”. Select this file, and its name will appear like in the screen above.
# Next, if the person who supplied you with the developer certificate also mentioned that to use the “key” file, you need a certain password, you need to enter it now. Tap on “Sign Key Pass” and enter the password given. If no password is needed, skip this step.
# Next, choose the directory where your signed file will be placed. I normally just use the source directory, ie. wherever you put the unsigned file, FreeSigner will sign it, and put the signed file in the same directory as the unsigned file. Makes life easy.
# Next, tap “Back”.
# To choose the file for signing, tap on “Add Task” and you will see a screen which asks you where the file is located. Choose the drive where your file is (C = phone memory, E = memory card), then choose the directory where the file resides as in the screen below.
2
Then, tap once on the file, and tap “Options” – “Add” as in the screen below.
3
Then, select the type of operation to be performed on the file, in most cases, actually, for me, for all cases I would select “Sign Sis” because my testing tells me that “Self Sign Sis” is useless and doesn’t work most of the time!
4
You are now brought back to the “main” screen, where your file to be signed appears as a “task” to be carried out by FreeSigner. The final step would be to tap “Options” – “Go” and your file would be signed!
5
Now, look for your signed file wherever you configured FreeSigner to put it – if you chose “Same As Source” in “Output directory” in the settings screen, then the signed file will be in the same directory as your unsigned file. The file name will have “_signed” appended to the end of the file name, like below:
6
In your built-in File Manager application or a third party file manager such as Y-browser (my favorite!), look for the file, tap on it once to install, and you’re done!

Download ( Signed )
Download ( unsigned )

Sony Bravia KDL-22PX300 offers built in PlayStation 2


Sony has released a television with a difference – with the Bravia KDL-22PX300 offers built in PS2 functionality allowing you to play your old games.
We can only imagine that Sony had a truckload of old PS2 tech to get rid of and decided to build it into a 22-inch television set.
Of course, despite the television being HD ready, the games are not – meaning you will get standard def old titles.
Brilliant or late?
We're not sure if this is fantastic or about five years out of date, but for those who want to dig out that old copy of Gran Turismo 4 for a nostalgia kick in their second bedroom then this may be just the thing.
When they build a PS3 into a Bravia 47-inch TV then we'll be at the front of the queue – unless of course it's in six years' time when the PS4 is in its pomp.
The Bravia KDL-22PX300 offers 4 HDMIs, 720p resolution, a Freeview tuner and costs £199. And, truthfully, it's not the prettiest thing in the world

12 Things to Do After You’ve Written a New Blog Post

<
You’ve just finished writing a great new blog post. You’re excited that you’ve shared your ideas and expertise with the world. But what should you do next?
As we work with companies to develop a regular content marketing and social engagement routine, blogging is always key. A strong corporate blog can pay big dividends in the form of increased customer engagement and search engine rankings. But what many companies forget is the “marketing” part of content marketing.
Even Great Content Can Go Unnoticed
We would like to think after hitting “publish” on a new post that the seas will part, angels will sing and Moses will lead customers straight into our shopping carts.  But that’s obviously not going to happen.
In reality, the only people who know your post is there are you and your RSS subscribers. After a while, a search engine spider will come along and your post will begin jockeying for search-engine position among the thousands of other web pages related to that same topic. Sure, your post is probably groundbreaking, but Google might not figure that out for months.
Rather than rely solely on search engines and a handful of subscribers to pump up your organic volume, content publishers need to establish syndication connections and plan for some targeted promotion to ensure that each piece of content gets noticed by key influencers and your ideal customers.

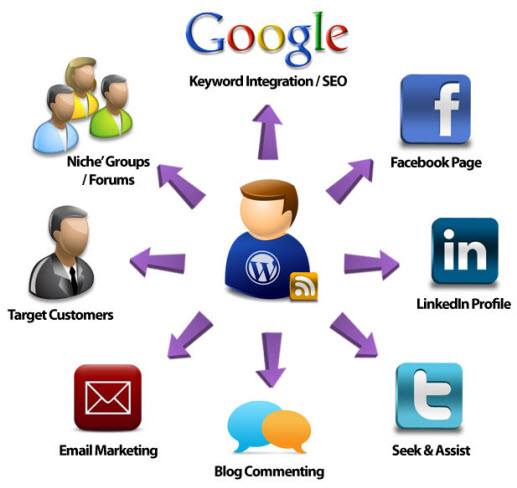
Blog Post Promotional Tools: Your 12-Step Checklist

1. SEO / Keyword integration

Your content may be good as is, but a little keyword research and integration can have a big impact on search engine rankings and traffic. Scan through your content and pick out the main topics covered in your post. Plug those terms/phrases into Google Adwords’ free keyword suggestion tool. Take note of the most popular search terms and variations in phrasing and wording. Go back to your content and try to beef up your post title, content, meta description and tags with those popular terms/phrases.

2. Syndication

One of the most powerful and misunderstood mechanisms of a blog is its RSS feed. This reallysimple syndication method allows you to automatically feed your blog’s content to many different places, including many social networking sites.
Let me say that another way. When your RSS feed URL is plugged into your social networking sites or profiles, hitting “publish” on your new blog post initiates an automatic “push” of that content to those sites. This can significantly expand your reach and save you hours of time versus posting content manually.
Also note that this step is more of a one-time setup. Once you have established RSS connections on your social sites, you shouldn’t have to do it again. To get started, locate your blog’s RSS URL and plug that into the following:
Facebook Business Page – In your applications area, search for the “Social RSS” application and get it set up to publish your content to your Facebook page wall automatically.
LinkedIn Personal Profiles – Look for “Blog Link” or “WordPress” in the applications section on your profile page and set it up to auto-post your content to your LinkedIn profile. Don’t forget to tell all of your employees to do this too. If you have a lot of employees, the increase in your potential reach could be gigantic.
Plaxo – Although not as popular, Plaxo is another great business networking site that makes it really easy to “add a feed” and plug in your blog content automatically.
Ning Community Sites – If any of your fishing holes are built on the Ning platform, you can plug in your feed using the “Add RSS” widget included on your profile page.
Other Social Networking Sites – There are many other social sites that allow you to plug in your blog’s RSS feed. Scour your sites for this option.

3. Shorten your post’s URL

This step used to only apply to posting links on Twitter, but with the addition of analytics (click-through tracking) on many of the URL shortening services, posting a shortened URL on any of your social sites is a smart strategy.
Here’s how it works:
  • Copy your new blog post’s URL, paste it in a URL shortener that offers analytics (Bit.ly, Ow.ly, Cli.gs).
  • Use the shortened URL in any status update, link posting or teaser you plan on executing.
  • Check your URL shortener account for click stats, geographic and referring site data after your link has been up a while.

4. Status updates

While this one may seem pretty obvious, it’s not that simple. Sure, you could just type your blog post’s headline into all of your social site’s status boxes, include your shortened link and call it good. But this might not get you the most clicks.
Realize that each social site is a bit different (environment, social etiquette, audience demographics / psychographics). Tailoring your status/headline for each community could make a big difference.
You also need to remember that when you post your new content via a status update, only a small percentage of your friends/followers will actually be online at that moment to see it. To maximize the likelihood of your followers seeing and reading your new post, you may need to send multiple updates on different days and at different times. You’ll also want to use different headlines each time since you may get banned from Twitter for sending the same post multiple times.
If your content covers multiple topics, create a different status update for each topic and then spread those out over the course of a few days. Don’t forget to ask your followers to share or retweet the link.
Productivity Tip: There are many tools out there that allow you to set up and schedule your updates to go out anytime in the future (Hootsuite, Twuffer, Later Bro). I’ll often schedule four to five updates with different headline variations all at once to post throughout the week.

5. Content teasers on other sites

Most social networking sites and online forums allow content promotion as long as it’s valuable, relevant to the community, and not blatant self promotion. A few examples:
  • LinkedIn group forums
  • LinkedIn Answers
  • Facebook groups
  • Ning community group forums
  • Niche industry forums.
A great strategy is to write a compelling headline or question as your forum post title, then include some thoughtful commentary followed by your shortened URL. Lastly, ask for readers to provide feedback on the forum to continue the discussion.

6. Social bookmarking

While this technique doesn’t have the horsepower it used to, posting your content to popular social bookmarking sites (Digg, StumbleUpon, Delicious, etc.) can still be a great source of traffic, backlinks and overall exposure. Think of social bookmarking as peer-reviewed content. If others bookmark/digg your content, the more exposure you get and the more opportunity you have for others to link to you or reference your content on their sites.

7. Seek out and comment on other blogs with similar topics

Providing helpful, valuable comments on other blogs can be a great way to generate traffic, develop relationships, build a following and add backlinks. If you’ve just finished a blog post on a topic, now is the perfect time to do a quick search to find other blog posts on the same topic. Are the other posts lacking something that you covered in your post? Add your viewpoint in a genuine, non-self-promotional way. If the comment form asks for your website URL, paste in your blog URL.

8. Seek and assist on Twitter

Genuine assistance is one of the best ways to build a community of loyal Twitter followers. Let me use this post as an example. When it’s posted and I’ve created a shortened URL, I might jump on Twitter and do a search for a phrase like, “need help promoting my blog.” Scanning the resulting tweets will probably offer me several opportunities to help people who are reaching out for help. I reply to them with some genuine advice and the shortened URL. The result is often a new Twitter follower, a new subscriber to my blog and a blog comment. Then I get all warm and fuzzy inside…in an opportunistic kind of way.

9. Email signature

Another powerful little technique is to add your latest blog post headline to your email signature. Many email platforms now have nifty little apps (Wisestamp for Gmail) that will pull your latest blog post headline into your email signature automatically. Do it manually if you have to. You never know when a prospect, vendor or client might read a post that sparks a conversation or creates an opportunity.

10. Share your blog post with target customers

You’ve just created a blog post that you know would be beneficial for certain customers. What are you waiting for? Send them an email with the shortened URL and a note, “thought this could really help your business.” Then check the analytics to see if they clicked on it.

11. Add your blog post to your next e-newsletter

If you have an e-newsletter, you should be incorporating at least some of your blog content. Include a few post headlines/teasers and see which posts get the most clicks. You may just find that you need to do some follow-up blog posts on a topic that received a lot of clicks.

12. Ask other bloggers to mention your post

Building relationships with other bloggers in your space and asking them to blog about or link to your post can be a great way to expand your reach. Reciprocating promotional efforts can have a big payoff in the form of high-quality backlinks and big jumps in search engine rankings, blog traffic and subscribers.
The First Time is the Hardest
As with most tasks in life, the first time through this list might be tough and time-consuming. Setting up accounts and getting to know the interface and functions of the various social sites may make your brain hurt. But it will get easier. I usually dedicate an hour to blog post promotion after each launch. Also note that most of these tasks can easily be outsourced.
The key is to make this promotional effort part of your process. It’s unfortunate when I see companies put so much time and effort into creating a solid content strategy, developing their editorial process and consistently publishing great stuff, but then it just sits there. Said another way, they have awesome bait but they’ve forgotten to go fishing.
Immediate, Trackable Results
If you’re using the shortened URL and have analytics installed on your website/blog, you should see your hard work pay off almost immediately. I typically see large spikes in traffic and conversions on the days I’m promoting a new post. Multiply this by a blog post per day and that activity spike is no longer a spike. It’s now a constant. Moreover, the results should be significant increases in activity, traffic, rankings, reach, opportunities and overall sales.

Facebook Do's And Don'ts For Teens


I have to admit, I have been a huge Facebook fan ever since the site began allowing adults onto the site.  In fact, ever since I joined, I have been amazed by all of the connections I've made.  For me, the best thing about Facebook has been re-connecting with former elementary, high school and college friends who I had lost touch with over the years but was really excited to re-connect and see them again in person.  My experiences on the social networking site have been incredibly positive - but that's because I use Facebook as a means to share positive news, engage in conversations with friends and colleagues and Like everything from TV shows, to brands to celebrities to blog posts and more.

As a parent and anti-bullying advocate, I also know quite well about the dangers of Facebook.  If your kids are still tweens, then no matter how much they beg you to get an account, just say no.  I have plenty of friends who have allowed their kids to join the social networking site at 12, but I'm here to tell you, the legal age for a child to be on Facebook is 13 and there are many reasons why you may want to hold off even longer, but peer pressure may get the better of your child.
Here's the skinny on Facebook.  If used appropriately, it can be an incredible tool to connect like-minded teens together worldwide.  If you have a child who heads off to sleep-away camp in the summer and is pining for their friends, Facebook is an instant connector that can erase the distance between them. Facebook is also a terrific tool to connect kids who play the same sports, support charities or causes, share a love of music and much more.  The whole concept behind Facebook is to share your stories, photos and videos and support your friends.  But when you're a young teen, the dark side of the social networking site could also do a lot of psychological damage to their self esteem.  So before your child dives into the sea of social networking, here are my top 10 Facebook Do's and Don'ts for teens and their parents:

1.   DO:  When your 13 old joins Facebook, make sure they friend you.  You don't need to hover over their every move, but make sure your teen is aware that you will check their account from time to time to ensure they're engaging in appropriate conversations with friends.  Also, make sure you stay on top of the people they've friended - especially if adults try to friend your child.

2.   DON'T:  Post a revealing picture of yourself as your profile photo or on your wall.  While a teen may think a funny party pose or revealing image is only available for their friends to see, if they are applying to colleges, they should think again.  College admissions officers can oftentimes access the pages of their applicants - better safe than sorry - if the photo is questionable, don't post it!

3.   DO:  Ask another mom to get in touch with you if they see something inappropriate on your child's Facebook wall.  Since your young teen may friend your friends, it's actually an opportunity for you to inform your friends that if they catch something inappropriate on your kids' page, to raise a red flag and get in touch with you. 

4.   DON'T:  Instruct your child not to have an argument with another teen on their Facebook Wall.  While a teen may think their war of words is harmless, think again.  When you hurl insults on one another's walls all of their friends can see the conversation play out on their Facebook page as well.  If you're having a disagreement with a friend, take it offline and resolve your differences in private.

5.   DON'T:  If your child sets up a fake Facebook page, then revoke their privileges immediately.  I've frequently heard about this from fellow moms - a strict parent attempts to police their child and right under their nose, they set up another Facebook account under an alias and does whatever they'd like online.  While it's hard to find out if your child is trying to fake you out, your best bet is to have that conversation before they officially join Facebook.  Setting up a fake Facebook page is illegal and can also create legal problems for a child - especially if they use that page to cyberbully their peers.  

6.   DO:  If your child notices another child cyber-bullying one of their peers, DO encourage them to speak up.  Facebook now has instant controls in place where you can report someone for abuse if you believe their comment or email message is inappropriate.  Don’t just be a bystander - get involved and help put an end to cyber-bullying!

7.  DON'T stalk people on Facebook by attempting to chat with them.  Lately, a few of my younger Facebook friends have used the "chat" option to reach out to me and ask me to vote for them for a variety of contests.  This rule actually holds true for adults too since a few of my FB friends are pretty big offenders of cyber-chat stalking too.

8.   DO use Facebook to get the word out about important causes.  If your teen is spearheading  or participating in an event on behalf of a charity, by all means, have them share information about it on their Facebook page.  You can even use the event option to invite friends to participate and share on their own blogs.  Sharing Facebook posts that are positive and benefit others is always a good thing.

9.   DON'T ignore the warning signs if your teen gets upset after logging off their Facebook page.  If your child suddenly withdraws, seems out of sorts, angry or depressed, cyber-bullying could be the cause. It's very easy for teens to hide behind text messages and Facebook comments - but the hurt is still pretty raw.  It might be hard for your child to share what is going on in their world, but be there to listen, give advice (when asked) and provide a shoulder to lean on. 

10.  DO join Facebook!  If you're a parent and don't have a Facebook page, then what are you waiting for???   I know that the thought of going through life without a Facebook page for some seems absolutely absurd. Well, there are some people out there (a good friend of mine among this batch) who have yet to sign up for Facebook.  I'm here to tell you that you must sign up for Facebook so that you can always stay at least 3 steps ahead of your child.  If you know nothing about social networking, then you are already behind the eight ball.  Join the site, re-connect with old friends and navigate your way through Facebook before your teen gets their first account.  Trust me, you'll be glad you did!